How To Install An OS On A Raspberry Pi
Now although RAM prices have been getting very expensive, the Raspberry Pi remains a popular small computer
And although I released a video showing how to install Pi OS, it’s been quite a while
The installation process is still easy to follow, but a lot has changed and I think it’s worth revisiting the Pi Imager
So how do you install an operating system like Pi OS on a Raspberry Pi and what are the other options now available?
Download Pi Imager:
You can still download the Raspberry Pi imager from the same website as before
https://www.raspberrypi.com/software/
The only thing I’ve noticed that’s different here is it no longer references Ubuntu, instead it refers to Linux in general
And what you download for Linux is an AppImage
Now once you download the software, regardless of the OS your computer has, the installation is so easy that it’s not worth covering it
In the case of Linux for instance you’ll download a standalone file, you’ll have to give that executable rights and then run it with elevated privilege
Prepare SD Card:
Now I’m going to assume your computer can access micro-SD cards directly or it’s connected to a hub that can
TIP: If it can only access SD cards, you can get an adapter that will help, although usually you get one when you buy a micro-SD card
The first thing to do is to insert the micro SD card into your computer
TIP: If at any time you see a dialog box to format the card click Cancel because we’ll be overwriting it anyway
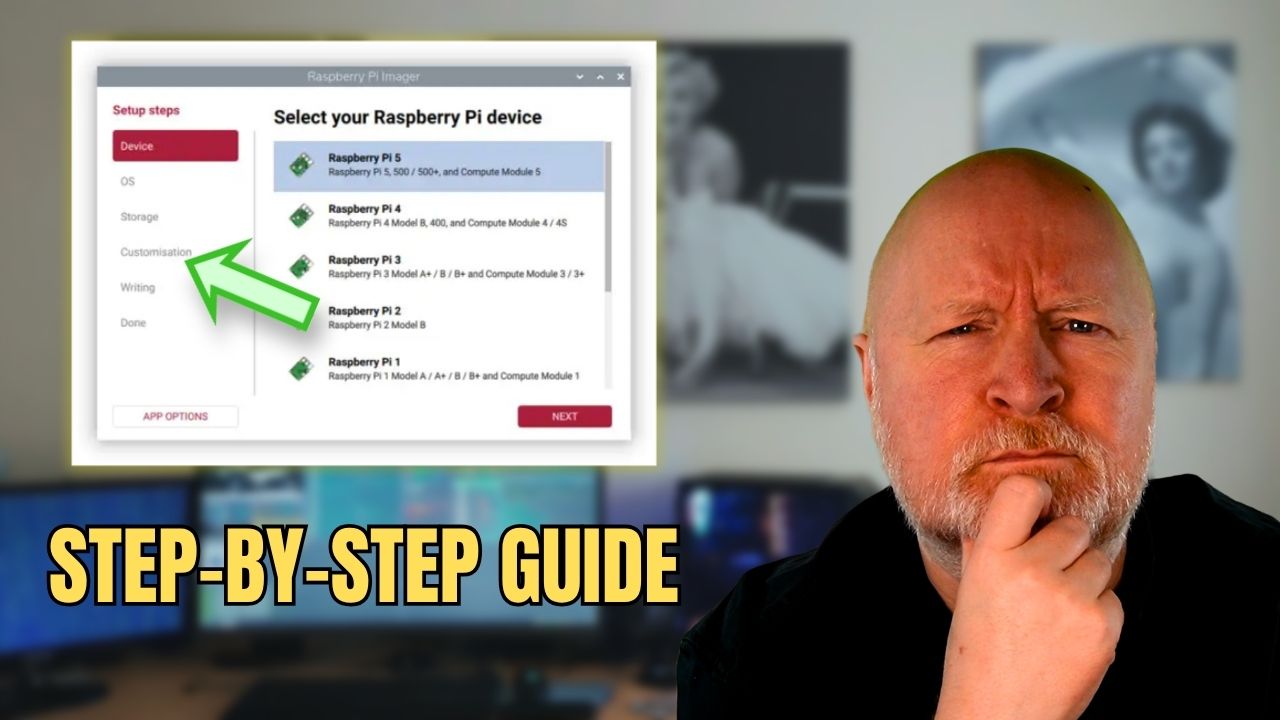
Now, run the imaging software and you’ll be prompted to choose the hardware version of Pi that you have and then click Next
This time round there are just so many choices available and I mean there’s a lot
You’ll see the typical desktop versions of Pi OS, but if you scroll down a bit you’ll see Raspberry Pi OS (other)
Click that and there are a few choices here, but crucially, this is where you can choose the Lite version which has no desktop and so is better for a headless Pi
TIP: Click OS in the left hand pane if you want to pick a different OS. Clicking Back takes you back to the choice of hardware
Further down the OS list is Other general-purpose OS
Click that and you’ll find options from Ubuntu to DietPi
Further down still and there’s an option for Media player OS which makes sense for a music centre choice
Click that and you’ve got choices of LibreELEC to PiCorePlayer
Next up we have Emulation and game OS
Click that and you can install RetroPie or Recalbox
Lower down you’ll find Other specific-purpose OS
Click that and the choices go from Falcon Player (FPP) to LoLaOS
If that’s not enough there’s an option for Freemium and paid-for OS
Click that and we’ve got Digital signage OS to Homey Self-Hosted Server
Looking for something completely different?
Well if you click Misc utility images you’ve got a Bootloader option for the Pi 4 family as well as a PINN multi-boot OS installer option
Last but by no means least, you can also just use this to Erase a card or import a custom image
For this example though we’ll be using Raspberry Pi Lite (64-bit)
Once you’ve decided what OS to install, click Next to move onto Storage
Fortunately the app is plug an play, so even if you plug the SD card in now, it will still show up in the list
Sensibly system drives are excluded by default
Pick the card you want to use for storage then click Next
Now we get our Customisation choices, although there is the option to skip these
A unique hostname always make sense, so enter one then click Next
Enter you Localisation details then click Next
Now you need to provide a username and password
Bear in mind, it does warn that the username must be in lowercase although it can contain numbers, underscores and hyphens as well as letters
Once you’ve entered those, click Next
If the Pi needs to connect to a network using Wi-Fi then you’ll need to enter the details here
There is a choice of using a secure network or an open one
An open network being one that only needs the SSID, and so is open to everyone, whereas a secure one needs a password and so is restricted to anyone who knows the password
If the SSID is being hidden by your Wi-Fi AP, then you’ll need to select the option of Hidden SSID
NOTE: There isn’t an option for an Ethernet network unfortunately. So as with Wi-Fi you’ll be relying on DHCP to provide an IP address and mask, a DNS server and a default gateway to the Pi if it’s going to be plugged into a network switch
If you want to assign a static IP address to the Pi, you’ll have to do this after the installation for most operating systems
Regardless, of whether you configure the Wi-Fi settings, you’ll want to click Next to move on
Remote access typically involves using SSH, so you’ll want to opt to enable the SSH server
There is a choice of authentication mechanisms, password or key authentication
Password authentication will involve supplying the password of the user that was created earlier when you login, but it’s more secure to use key authentication
For key authentication to work you’ll have to supply the public key of the user’s private/public key pair
As well as typing this or pasting it in, you can also point the app to a file on your computer
How you setup key pairs is outside the scope of this video, but I do have videos showing how you can do that for Linux and Windows for instance
Once you’ve made your choice, click Next
Interestingly, we now have an option called Raspberry Pi Connect when you install Pi OS
This is a cloud service that will let you access a Pi from anywhere over the Internet
Personally I don’t trust cloud services like this as hacking is usually a matter of WHEN not IF
But it is there as an option, although you’ll need to pay for a subscription
Now click Next and you can review your choices
Bear in mind, there is an App Options button in the lower left you might want to check out
This lets you decide if you want to hear a sound when the card is ready, eject the media at the end, send analytics to the developer and show warnings
There is also an option for a Content Repository
This to me makes more sense for customised installations as you can set the repository source as a custom file or URL
Regardless, you’ll need to click Write to then format and install the OS to the SD card
There is a slight delay and then you’ll need to confirm you want to erase and overwrite the card
Then you just have to wait a while for this to complete as SD cards are slow to write to and the imager will also verify the installation
Remote Login:
With the card now ready you can remove it from your PC, install it into the Pi and power it on
Leave it for maybe 5 minutes to fully boot up
At some point it will get an IP address from your DHCP server and you’ll typically want to know that in order to login to the Pi
Now, if you connect a monitor to the Pi, then with Pi OS at least, you’ll see that IP address displayed at the login prompt
You could of course check your DHCP server to see what IP addressed was leased
Or login locally and run the following command to see what IP address is assigned
ip -br addrIt’s then a matter of connecting to your Pi using SSH, for example
ssh pitest@192.168.1.150Having said that, if your’re logging in from computer on the same network you might be able to use the local domain option instead, for example
ssh pitest@pitest.localReserving an IP address for the Pi in your DHCP server makes sense if your firewall restricts outbound access
The alternative is to create a static IP address on the Pi although how you do that depends on the OS you’ve installed
Either way, if you have a local DNS server then update that so you can access the Pi using an FQDN going forward
Update Software:
The last thing to do is to update the OS and all the packages installed to make sure everything is up to date
Pi OS is based on Debian so as it uses the APT package manager we can do the following
sudo apt update && sudo apt upgrade -yBear in mind this will take quite a while, especially on a Pi Zero W
Once it’s done, reboot the computer for this to take affect
sudo reboot nowNow I would strongly suggest installing a firewall like UFW to lock down remote access to the Pi
And I do have another video on how to install and configure UFW
But in any case, you now have a Pi running Pi OS, and it’s down to you to decide what you want to do with it
Sharing is caring!