OPNSense High Availability

In the video below, we show you how to configure High Availability for OPNSense
Firewalls like OPNsense are essential for IT security, but sometimes they can be too secure
For instance, if your firewall crashes then yes you have a very secure network, but now nobody can access anything
In which case you’ll want to have a redundant firewall to protect against outages and help with maintenance
And in this video we’ll go over how to configure High Availability for OPNSense
Useful links:
https://docs.opnsense.org/manual/how-tos/carp.html
https://www.zenarmor.com/docs/network-security-tutorials/how-to-configure-ha-on-opnsense
Assumptions:
Now as this video is specifically about setting up redundancy, I’m going to assume you already have OPNsense installed on two devices or you at least know how to install OPNsense
If not, then I do have another video which shows you how to install OPNsense on a VM for instance
In addition, I don’t advise watching this video for the first time and making changes as we go along
Changing a firewall can result in unexpected problems just because the MAC address has changed for instance
And some devices may not play well with this new setup
And the last thing you need is to be stuck trying to fix problems
So to be prepared, I’d suggest to watch the video first to at least get an understanding of what’s involved
Then test this in a lab before arranging something like this in a live environment
Overview:
Now in order to have firewall redundancy you’ll need to be running OPNsense on two firewalls
Both firewalls will need interfaces in the same networks, but their IP addressing needs to be unique
NOTE: The names of all of the interfaces should be the same. Simply having interfaces in the same subnets is not sufficient
OPNsense is based on the FreeBSD operating system and this allows the firewalls to take advantage of CARP or Common Address Redundancy Protocol
Each firewall will have its own interface IP addresses but as group they’ll share an IP address that other devices will use as their default gateway
For this video, the WAN subnet is 10.1.1.0/24 and the LAN subnet is 10.1.2.0/24
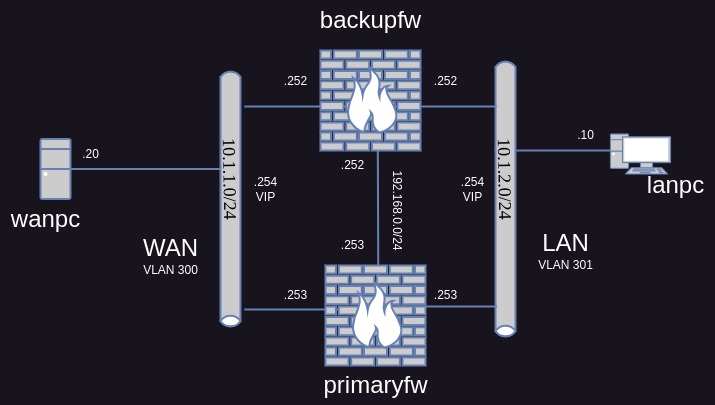
For the primary firewall, the WAN interface will have an IP address of 10.1.1.253 and for the LAN interface this will be 10.1.2.253
For the backup firewall, the IP address for the WAN interface will be 10.1.1.252, and for the LAN interface it will be 10.1.2.252
When we configure CARP on these, we’ll setup a virtual IP address of 10.1.1.254 for the WAN and 10.1.2.254 for the LAN
Devices will then point to these virtual IP addresses as their default gateway
Normally what will happen is that the primary firewall will be the active firewall and it will handle traffic sent to the virtual IP addresses
The backup firewall in the mean time will operate in standby mode
But if the primary firewall goes offline, the backup will take over the active role and it will handle traffic sent to the virtual IP addresses
The benefit of this method is that we don’t have to make any changes to our other IT devices if there’s a firewall outage
Now most firewalls have what’s known as a state table that keeps track of connections as they are allowed through
Since traffic is only passing through the active firewall, the standby firewall needs to be kept up to date so that if it takes over it knows what existing connections to allow
Because if it didn’t know about these existing connections, users for instance would be forced to reconnect to devices as the newly active firewall would refuse to allow that traffic through
In order to keep the backup firewall up to date, it’s best if there is a dedicated connection between the two firewalls
For this video, we’ll use the 192.168.0.0/24 subnet
Now we could get creative and reduce this to 192.168.0.252/30 for instance, but the rest of network will be in the 10.0.0.0/8 network range, so it’s unlikely we’ll run into an internal conflict
As well as setting up CARP, we also need to setup pfSync and HA sync
On top of that, we also need to tweak any existing NAT configurations
By default, OPNsense will automatically NAT traffic to the IP address assigned to the WAN interface for example, but we want to use the virtual IP address otherwise redundancy won’t work properly
Strategy:
Now currently we have a single firewall but we want to add redundancy to it
In an ideal world you could build a new pair of redundant firewalls and then swap out the old firewall
That’s relatively simple to do in a virtual enviroment and it probably won’t cost you anything to do
But if you’re using physical devices, the cost to purchase two new devices and be left with a spare one may be prohibitive
So in this video we’re going to take the more difficult approach which involves keeping the existing firewall
Building two new firewalls would be similar, expect in this case we have to reconfigure the original
The assumption is that there is an existing firewall plus a new one that has a fresh installation of OPNsense
Any packages installed on the existing firewall will need to be installed on the new firewall and may need an initial configuration to at least to get started. This isn’t covered in this video as there are too many to cover
What we’ll do is take a backup of the existing firewall’s configuration
Packages will need to be backed up separately and aren’t covered in this video, although some may require manual configuration if they don’t include a backup option
TIP: For a virtual machine, now would be a good time to take a snapshot as well
Next, we’ll isolate the new firewall because we want to minimise downtime and duplicate IP addressing on the network would result in an outage
In a physical environment you could patch it to a spearate network switch
We could do something similar on a hypervisor, but since we have to make changes to the vNICs anyway, we’ll just renumber the VLAN tag to 2xxx
This carries less risk as won’t modify the hypervisor’s network settings
NOTE: This lab has just one node. For actual redundancy you would have the firewalls running on different hypervisors
We’ll then restore the existing firewall configuration onto the new firewall
Packages though will need to be restored separately and aren’t covered in this video
Now this will create a more or less identical firewall but we’ll be able to make change to this one while leaving the live network untouched
Once the new firewall is ready, we’ll swap out the existing firewall with the new one
To do that we’ll first isolate the original firewall, putting its vNICs into VLAN 3xxx
Then we’ll move the new firewall’s vNICs into the live VLANs
Bear in mind, the MAC addressing will change and this may cause problems for devices that refuse gratuitous ARPs for instance
In addition, network security may need to be updated if it involves MAC addressing
No matter what we do, we’ll cause disruption, but this should be relative quick and better still it offers a simple way to back out the change
We’ll test connectivity with the new firewall, and if we run into a problem we’ll try and fix it. If we can’t, we’ll put the original firewall back in place as a last resort
As long as everything seems to be fine, we’ll then reconfigure the original firewall and move it back to the live VLANs
Backup Firewall Configuration:
For this video I installed OPNsense onto a new firewall and I went as far as running the setup wizard to conplete the installation
Although an alternative option would be to restore a backup during the installation
Make sure both firewalls are running the same version of software before starting
Taking a backup of the existing firewall is relatively simple
Navigate to System | Configuration | Backups
Under Download, click the Download configuration button
TIP: For extra security, enable the Encrypt this configuration file option first and supply a password
Depending on your web browser you’ll either be prompted for a download folder or the file will be downloaded straightaway
If the firewall has any packages installed, you will need to backup these as well, if possible or at least note down the configuration
How you do that depends on the package and is beyond the scope of this video
Isolate New Firewall:
Before we go any further, we should isolate the new firewall, otherwise you’ll end up with two firewalls that conflict with each other
For me, this is a virtual machine, so rather than re-patching physical cables, we’ll re-patch virtual ones
How you do that depends on the hypervisor, but for Proxmox VE we’ll modify the VLAN tag on the vNICs
I’m not using any VLANs in the 2xxx range, so I’ll keep things simple and change the LAN interface from 301 to 2301 and the WAN interface from 300 to 2300
Because I need to work on this firewall, I’ll also update the tag for a PC on the LAN and move it from 300 to 2300 as well
Then we’ll double check we still have access to the new firewall
Restore Firewall Configuration:
Now that the firewall is isolated, we can make changes to it without causing disruption
What we’ll do first is to restore the configuration from our existing firewall over this one
To do that navigate to System | Configuration | Backups
Scroll down if needed and under Restore, click the Browse button
Either double-click or select the backup file created earlier then click Open
TIP: If the configuration file is encrypted then enable the Configuration file is encrypted option and provide the password
NOTE: There will be no confirmation option, the existing configuration will be overwritten and the system will be rebooted
Now click Restore configuration
We’ll wait for the firewall to come back up, but once it’s ready, we’ll need to log into the firewall using the original LAN IP address because we now have a replica of our original firewall
Any packages being used should be installed and their configuration restored or manually configured, but that’s beyond the scope of this video
Initial Changes:
Before we add any redundancy to this firewall, we need to make some other changes
First we need to change the IP addressing, because the default gateway is currently assigned to the interfaces
In which case, I strongly suggest you have console access to this firewall in case things don’t go to plan
We’re going to change the outer interface(s) first and the LAN or management interface last as changing the IP address that you’ve logged into will lose you connectivity
This lab firewall only has two interfaces so first we’ll navigate to Interfaces | WAN
Then we’ll scroll down and change the IPv4 address in this case from 10.1.1.254 to 10.1.1.253
Next we’ll click Save and then click Apply changes
Now we’ll navigate to Interfaces | LAN
We’ll then scroll down and change the IPv4 address in this case from 10.1.2.254 to 10.1.2.253
Next we’ll click Save and then click Apply changes
The problem though is we’ve now lost connectivity and eventually it will time out
So we’ll connect back by putting the new IP address in the web browser
TIP: Don’t simply change the last octet in the URL and try to connect to the previous page as it will likely be rejected. Instead point to only the IP address as the URL then log back in
The new setup will involve a primary and a backup firewall
So, I’m going to change the name of this firewall to primaryfw as this one will be the primary
To do that, we’ll navigate to System | Settings | General
We’ll then change the hostname, scroll to the bottom and click Save
To keep the hypervisor in synch, we’ll change the virtual machine name as well
In the case of Proxmox VE, you click on the VM, navigate to Options, select the Name then click Edit
Then you can change the name and click OK
Configure CARP:
One of the main parts to this firewall redundancy will be CARP
This is what allows the default gateway to be transferred from one firewall to another, meaning that there won’t be changes needed on other network devices if a firewall fails for instance
To configure CARP, we’ll first navigate to Interfaces | Virtual IPs | Settings
Click the + button to add a new virtual IP
We’ll setup the WAN side first so change the Mode to CARP
Now change the interface to WAN
Set the IP address to what’s relevant for the WAN interface, in my case 10.1.1.254/24
In other words, the WAN IP address of the existing firewall
For security reasons it’s best to provide a password, this is to prevent other devices on the network interfering as the two firewalls will communicate with each other through their interfaces
Next enter a number for the VHID group, we’ll use 1
TIP: Unfortunately, the range is 1 to 255, so unlike Cisco’s HSRP v2, you can’t as easily align this with a VLAN for instance
Leave the advbase, or advertising frequency, as is, i.e. set to 1
Enter a useful description, for example, WAN VIP
Now click Save
We’ll now need to do the same for the LAN interface so click the + button
Again, we’ll change the Mode to CARP
LAN is the default interface so we’ll leave that as is
Set the IP address to what’s relevant for the LAN interface, in my case 10.1.2.254/24
In other words, the LAN IP address of the existing firewall
Supply a password to improve security
Now, in the documentation you’ll read that each VIP needs a unique virtual host ID
From a CARP perspective, it means that you can’t have two pairs of devices in the same subnet using the same VHID as otherwise they’ll conflict with each other
But you could potentially use the same VHID on different interfaces on a firewall pair
However, we’ll follow OPNsense’s own interpretation and keep this unique across the firewall, so each VIP will have its own VHID
In which case, we’ll use 2
Leave the advbase, or advertising frequency, as is, i.e. set to 1
Enter a useful description, for example, LAN VIP
Now click Save
Continue to setup CARP for any other interface the firewall has
NOTE: CARP isn’t relevant for a dedicated managment interface as each firewall should have a unique managment IP address anyway. It’s purpose is to access that specific firewall and adding redundancy would make no sense as you’d always access the active firewall
For all the changes to take affect, click Apply
TIP: Unfortunately you don’t get much notice that the changes were applied other than maybe a brief “flash” next to the Apply button
To check if CARP is now up and running, select Status and in the status column for each interface you should see a green play button followed by MASTER
Outbound NAT:
Typically, a firewall acts a security boundary between a private network and the Internet
And in those cases, NAT will be used to translate the internal IP ranges from private to public
By default, OPNsense is configured with an automatic NAT rule which basically means that when traffic is sent out the WAN interface, the source IP address will be set to the IP address of the WAN interface
This is going to cause problems for high availability, because if traffic left the firewall with an IP address of 10.1.1.253 and the firewall than failed, existing traffic will be dropped by the newly active firewall
In which case, we need to reconfigure NAT to use the virtual IP address instead
First though we’ll create an alias to represent the internal networks
Navigate to Firewall | Aliases
Now click the + button to create a new one
Enter a name, for example NAT_Subnets
Now change the Type to Network(s)
In the content field enter the network address for the LAN, in this example 10.1.2.0/24 and hit return
If you have any other internal networks that need to be include in NAT, enter those as well
Enter a description for the alias then click Save
For the changes to take affect, click Apply
Now navigate to Firewall | NAT and click Outbound
Change the Mode to Manual outbound NAT rule generation and click Save
Click the + button to create a new rule
For the Source address, change this from any to the alias we just created
Scroll down and change Translation/target to the WAN VIP created earlied
Scroll down and click Save
Now although an automatic rule will show multiple options for the source, a manual rule only seems to be able to accept one
This is why we created an alias, otherwise we’d have to create a rule for every internal network
Now click Apply changes for the changes to take affect
Configure HA Link:
Going forward we’ll have two firewalls, but the active firewall will need to keep the backup up to date
In which case, it’s best to setup a dedicated interface for this
While it isn’t essential, it is recommended, and these lab firewalls do have a third interface
So we’ll navigate to Interfaces and click Assignments
Select the interface from the Device list then click Add
Click the name of the new interface and select Enable interface
Change the Description to something more meaningful, for example HALINK
We should use static IP addressing, so change the IPv4 Configuration Type to Static IPv4
Scroll down and enter the IPv4 address for this link, in this case 192.168.0.253
And change the subnet mask length, in this case 24
Then click Save
Now click Apply changes
Extra Firewall Rules:
By default, OPNsense blocks most traffic on new interfaces so we’ll need to add some new firewall rules
Navigate to Firewall | Rules then click the HA link interface
Click the + button to add a new rule
Change the Protocol to PFSYNC
At least change the Source to the local network range, in this example HALink net
Enter a description, for instance pfSync traffic
Click Save
The expectation is that this is a dedicated network, a crossover cable for instance in a physical network, or at least a dedicated VLAN with only the two firewalls as members
If you do want to be more secure though and want to lockdown the source and destination, we have to remember that the rules will be synched
In addition, even though the documentation example involves a unicast address, I have noticed multicast traffic on the link
The active firewall also needs to be able to login to the backup firewall in order to make changes, so we’ll add another rule to allow HTTPS traffic
Click the + button to add a new rule
Change the Protocol to TCP
At least change the Source to the local network range, in this example HALink net
Change the Destination port to HTTPS, unless the default port has been changed
Enter a description, for instance GUI traffic
Click Save
Then click Apply changes for these to take affect
There should be automatic rules in place to allow CARP on all interfaces, so we don’t need to add other rules
pfSync and HA sync:
OPNsense uses pfSync to synchronise the connection state tables
This is so existing connections will still be allowed through the firewall if a failover takes place
We also need to configure HA sync to synchronise the configuration settings
In other words, we’ll make changes on the active firewall and these will be passed on to the backup
To configure these, navigate to System | High Availability and click Settings
Under General Settings is where we setup pfSync
Enable the option Synchronize States
Select the dedicated HA link the firewalls will communicate on
TIP: As a last resort, use an internal interface as it should be more secure
We only have two firewalls, so for the Synchronize Peer IP field, we’ll enter the IP address that will be assigned to the other firewall, in this example 192.168.0.252
Next we’ll setup HA sync
In the Synchronize Config to IP field, you’ll want to enter the same IP address as we’ll use the same interface, so in this example it will be 192.168.0.252
Set the Remote System Username to root, unless you have another account that can be used
For the Remote System Password field, enter the password
Scroll down and under Services to synchronize at least select the following:
Virtual IPs
Firewall Rules
Aliases
NAT
Check through the list to see if anything else would be relevant and select those
For instance, DHCPD makes sense if you are using the DHCP server
I’ll be modifying the Dashboard, so will add that as well
Scroll down then click Save
Initial Testing:
Now it’s recommended to first check if the new firewall appears to be working before bringing it into service
I have another computer on the WAN side to allow me to test traffic through the firewall
First we’ll try to ping that
ping 10.1.1.40
Then we’ll try to SSH into it
ssh 10.1.1.40
The reason I’m using SSH as well is so we can then run a command to check if NAT is working as expected
who
In other words, it shows the IP address you logged in from
What we expect to see is the IP address of the VIP and not the one assigned to the WAN interface
Isolate Existing Firewall:
Now before we bring the new firewall online, we should isolate the existing one, otherwise the IP addressing will conflict
This will cause an outage, but we’ll have a simple way to bring it back online if necessary
First things first though, users should be warned of this outage
As before, we’ll change the VLAN tags on the firewall’s vNICs
This time I’ll use the 3xxx range, so I’ll change the LAN interface from 301 to 3301 and the WAN interface from 300 to 3300
Activate New Firewall:
Now we can activate the new firewall and I’ll do that be updating its vNICs
The LAN interface will be changed from 2301 to 301 and the WAN interface from 2300 to 300
I also need to change the VLAN tag for the LAN PC from 2301 to 301 as well
Test New Firewall:
With the new firewall in place, it’s time to test things again
First we’ll check that we still have access to the new firewall
And make sure this is the correct firewall by checking the status of the VIPs
To do that, we’ll navigate to Interfaces | Virtual IPs and clicking Status
We’ll also connect to the default gateway IP address through the web browser, to make sure it connects us to the correct firewall
Then we should make sure users have access to everything
In my case, this is just a simple lab
First we’ll try to ping a computer on the other side of the firewall
ping 10.1.1.20
Then we’ll try to SSH into it
ssh 10.1.1.20
Again, we expect to see the VIP to be used in NAT when we run the following command
who
Bear in mind, you can run into issues simply because the MAC address has changed for instance
Some devices will accept the new MAC address, but others may need the ARP table or even a MAC address table flushing to force them to accept the new MAC address of the default gateway
And if you have any network security features they may need updating with the new MAC address as well
In any case, once we’re comfortable with the new firewall it might be best to leave things as is for a day or two
This will allow us to “iron out any kinks” if they show up during normal use
And we can still fall back to the original firewall if necessary
Reconfigure Original Firewall:
Unless you’re setting up two new firewalls for redundancy, you’ll need to reconfigure the original one
I isolated the firewall in some 3xxx VLANs and moved my LAN PC to VLAN 3301 to be able to reach it
So in the web browser, we’ll connect to this firewall by pointing to 10.1.2.254
To double check it’s the original one, we can check the name but we’ll also navigate to Interfaces | Virtual IPs and clicking Status
I know that only the new firewall has any VIPs configured so it’s another way to be sure
First we’ll change the WAN interface IP address so we’ll navigate to Interfaces | WAN
Then we’ll scroll down and set the IPv4 address to 10.1.1.252 and click Save
Then click Apply changes for this to take affect
If you have any other interfaces you’ll need to repeat this for them, but the last one we’ll update is the LAN interface
Next, we’ll navigate to Interfaces | LAN
Then we’ll scroll down and set the IPv4 address to 10.1.2.252 and click Save
Then click Apply changes for this to take affect
This will disconnect us and eventually the session will timeout so we’ll just point the browser to the new IP address and log back in
This will become the backup firewall, so we’ll change its name to backupfw
To do that, we’ll navigate to System | Settings | General
We’ll then change the hostname, scroll to the bottom and click Save
To keep the hypervisor in synch, we’ll change the VM name as well
As one last check, look in the interfaces section to make sure none of the interfaces are still configured with the default gateway address
Activate Backup Firewall:
We should now be able to move the original firewall back to the live network
There is the potential for it to cause problems, so it’s always best to make sure users are ready for a possible outage
In my case I’ll be updating this virtual machine’s vNICs
The LAN interface will be changed from 3301 to 301 and the WAN interface from 3300 to 300
I also need to change the VLAN tag for the LAN PC from 3301 to 301 as well
Again, we’ll check we can still access this firewall through the web browser
Configure HA Link:
Now in order to have redundancy, we need to configure the backup firewall to support pfSync
First though, we need to setup the dedicated interface for this firewall
So we’ll navigate to Interfaces and click Assignments
Select the interface from the Device list then click Add
Click the name of the new interface and select Enable interface
Change the Description to something more meaningful, for example HALink
We should use static IP addressing, so change the IPv4 Configuration Type to Static IPv4
Scroll down and enter the IPv4 address for this link, in this case 192.168.0.252
Change the subnet mask length, in this case 24
Then click Save
Now click Apply changes
Configure pfSync:
Next we need to setup pfSync on the backup firewall, so navigate to System | High Availability and click Settings
Under General Settings, enable the option Synchronize States
Next, select the relevant interface for the firewalls to communicate on, if that isn’t already selected
And for the Synchronize Peer IP field, enter the IP address that has been assigned to the other firewall, in this example 192.168.0.253
Now as per the documentation, this is all we should do
In other words, leave everything else untouched because only the primary needs to send configuration updates to the backup
Scroll down then click Save
Extra Firewall Rules:
As with the primary firewall, we need to add some new rules to the HA link interface
Even though the primary will synch its configuration to the backup, at this stage it won’t be able to get access to it, so we have to add these initial rules
Navigate to Firewall | Rules then click the HA link interface
Click the + button to add a new rule
At least change the Source to the local network range, in this example HALink net
Change the Protocol to PFSYNC
Enter a description, for instance pfSync traffic
Click Save
We also need a rule for access to the GUI, so click the + button to add a new rule
Change the Protocol to TCP
At least change the Source to the local network range, in this example HALink net
Change the Destination port to HTTPS, unless this has been changed
Enter a description, for instance GUI traffic
Click Save
Then click Apply changes for these to take affect
Reboot Firewalls:
The next step is going to cause an outage because as the documentation suggests, we need to reboot both firewalls, so make sure users are aware
There is no mention of a particular order, but we’ll reboot the primary, then once that’s back up we’ll reboot the backup
To do this we’ll navigate to Power, click Reboot and click Yes
Once both firewalls are up, login to the primary firewall
Navigate to System | High Availability and click Status
If the primary is having a problem connecting to the backup there will be a long delay as it tries to bring up this page
In which case check the firewall logs as it’s likely that traffic is being blocked on the HA interface and rules need to be added
Assuming things are working, you should see details about the software version on the backup firewall
In addition, the services should be showing a green play button to show that they are active
Now login to the backup and navigate to Interfaces | Virtual IPs and click Status
Chances are there won’t be any VIPs defined
WARNING: Synchronisation of the configs is not automatic
Now I think this is where redundancy for OPNsense begins to fall apart, or at least for me
On other firewalls I’ve used, synchronisation from the primary to the backup is automatic
At no point in the documentation did I see a mention of creating VIPs on the backup, or the lack of automated synchronization
When you get to the stage after rebooting both firewalls, the documentation implies everything should just work, but it doesn’t, or at least for me it didn’t
This suggests to me that the documentation is out of date
In forums I’ve seen mention that this used to be automated, but then it became a manual process
In which case, on the primary firewall, navigate to System | High Availability and click Status
Now click the option to synchronize config to backup which is at the end of the Synchronize line
Assuming this works you should see a tick appear for both Synchronise and Templates
If you now check the backup firewall, the VIPs should show up
These should show a grey play button and BACKUP
Whereas on the primary there will be a green play button and MASTER
It is possible to run into a problem where the primary firewall is rebooted for instance but complains of an issue with CARP and so it demotes itself. This leaves you in a situation where the backup remains the active firewall
There are no logs to show traffic is being blocked by firewall rules, but in the general logs you’ll likely see a message like “pfsync bulk fail”
One way to remedy this is by placing the primary firewall into maintenance mode and then taking it out of maintenance. This resets its level back to 0
An alternative option to transfer the active role is to reboot the backup firewall. This forces the primary to take further action
So it seems that even though the traffic doesn’t appear to be blocked, a transfer isn’t successful and so the primary demotes itself
From personal experience, I only saw this problem during the recording of the video, and it wasn’t easily reproducible
Several attempts of rebooting the primary firewall while not recording the video, didn’t result in a demotion
Now if a firewall rule was blocking the traffic, this problem would have showed up every time
This makes me wonder if the primary firewall sometimes isn’t ready to receive a state table update from the backup and would have benefited from a slight delay before declaring itself ready
Whatever the reason, it’s something to be aware of
Testing Failover:
We need to make sure that high availability is actually working, but this should only be done with an understanding amongst users that there could be an outage
First I’m going to open a terminal on the LAN PC and start a continuous ping to the WAN PC
In another terminal I’m going to login to the PC using SSH
Now this is not a precise method but what we’re going to do is to reboot the primary firewall to simulate an outage
In a physical environment it would probably be better to pull the network cables out quickly
Now while a reset of a VM would be equivalent to a power outage, it risks corrupting the disk, so hence why we’ll just do a reboot
What we are expecting, is a smooth and hopefully seamless transition
While the primary reboots, we’ll check the VIP status of the backup firewall
To do that, we’ll navigate to Interfaces | Virtual IPs and click Status
We should see this take over the VIPs and become the active firewall
And if we check our terminal sessions, they should be still working
Once the primary firewall is backup, it should takeover as the active firewall because by default we have preemption configured and the primary firewall has higher priority
If we login to the primary firewall, then navigate to Interfaces | Virtual IPs and click Status, we should that it has taken over the VIPs
And if navigate to System | High Availability and click Status it should show connectivity to the backup firewall
As a final meausure, we’ll check our terminal sessions are still working
Automated Configuration Updates:
Going forward, all changes should be made on the primary firewall ONLY
These should then be synched to the backup
In other words, the backup firewall is only there to provide redundancy because any changes made to it, would be overwritten anyway
This to me opens up the risk of the configuration on the backup firewall becoming out of date if someone forgets to run a manual config synch
One way to remedy that is to run a regular cron job on the primary firewall
Now although this scheduling isn’t mentioned in the official documentation, those put together by Sunny Valley Networks, the developers of Zenarmor, have suggested it would be useful to have this running once per day
To do this, navigate to System | Settings and click Cron
Click the + button to add a new job
To run this at say 02:00 every day, change the Hours setting to 2
For the Command select HA update and reconfigure backup
Enter a description, for example Synch to Backup Firewall
Click Save
Now click the Apply button for the changes to take affect
Dashboard Monitoring:
It’s useful to be able to monitor CARP from the dashboard, so on the primary firewall navigate to Lobby and click Dashboard
In the top right corner, click Add widget
Select CARP then click Close
Now click Save Settings
Because we’ve made a change, the backup firewall will need updating so navigate to System | High Availability and click Status
Now click the option to synchronize config to backup which is at the end of the Synchronize line
NOTE: You will need to have enabled Dashboard as an option when setting up HA Sync for this to work
Oddly enough, you don’t get a warning when making changes like these, but if you update the firewall rules for instance you do get a reminder to synch the config
Software Updates:
There will be times when the primary firewall needs to be taken out of service, for instance when a software update is needed
In theory there shouldn’t be much of an interruption, however, it’s still best to plan for a possible outage and arrange this when it’s less impacting
As an extra precaution, it would make sense to synch the config to the backup firewall first
To do that, login to the primary firewall
Now navigate to System | High Availability and click Status
Then click the option to synchronize config to backup which is at the end of the Synchronize line
Next, you should update the software on the backup firewall, reboot it and wait for it to come back online
Check the status on the primary firewall by navigating to System | High Availability and clicking Status
You should see the newer software mentioned there but more importantly all the services should show as up
We’ll then put the primary firewall into maintenance mode so that we can test the backup firewall works with the newer software
To do that, navigate to Interfaces | Virtual IPs and click Status
Here there is an option to Enter Persistent CARP Maintenance Mode
Click that and you should see under Status that the interfaces are showing a grey play button and BACKUP
If not, refresh the web page
Check the same page on the backup firewall and you should see a green play button and MASTER
If not, refresh the web page
Carry out any testing to double check there aren’t any connectivity problems before proceeding
If there are, you can always fall back to the primary firewall
Assuming there are no problems, the primary firewall can be updated and then rebooted
Once that firewall is back up, login and navigate to Interfaces | Virtual IPs and click Status
Now click Leave Persistent CARP Maintenance Mode
NOTE: If you forget to do this, you won’t have any redundancy
You may need to refresh the browser, but the status should have changed to green play button and MASTER
In other words, the primary firewall is the active firewall again and both firewalls are up to date
Summary:
Even if you have an existing OPNsense firewall which is running as a standalone firewall, you can still make it redundant
And the setup process isn’t too diificult
However, there’s no warning in the documentation, or at least none that I found, that configuration changes are not synched automatically
This has the potential for you to end up in a situation where the primary firewall fails and users can’t connect to resources because the backup firewall is out of date
It’s not really a show stopper though, because you can setup a cron job for instance to backup the configuration once every day out of hours
And once per day does seem to be the suggested interval
Of course, this is still better than having no redundancy at all
But it would be good to develop the habit of manually synching the configs every time you make a change
Sometimes you will get warnings to do this, but sometimes you don’t, so it’s better if manual updates becomes second nature
Now I did run into some strange problems with CARP while recording this video, but oddly enough I’ve only seen these whilst recording
It didn’t cause any significant problems and I could work around it, but when this happened I noticed error messages in the general log saying “pfsync bulk fail”
I haven’t seen a fix for this, although I have seen comments in a forum that changing from unicasting to multicasting in the pfSync configuration might help
Since the documentation shows a unicasting setup and the errors were infrequent, I’d be inclined to leave these setting as is unless this problem worsens
But from what I can tell, this redundancy is worthwhile setting up
Sharing is caring!